Search Results - seeed

Grove – Universal 4 Pin Unbuckled Cable 20公分無扣母對母連接線 (5條包裝) seeed

Grove – Universal 4 Pin 20cm Unbuckled Cable (5 PCs Pack)

無扣母對母連接線 (5條)

Grove – 4pin 20CM 無扣母對母連接線 (5條)本線材適用本公司所有 Grove 類型感測器與擴充卡。

本商品出貨一件為 5 條連接線為一個單位。

Grove - Universal 4 Pin 20cm Unbuckled Cable (5 PCs Pack)

Grove – NFC Tag 近場通訊標籤模組 seeed

Grove – NFC Tag 近場通訊標籤模組

Grove – NFC Tag 是一款基於意法半導體M24LR64E-R集成解決方案的近場標籤模塊。通過I2C接口與主機通信,內建64位唯一識別碼同時集成了64Kbit EEPROM。模塊外擴了一個PCB天線,可以很方便安裝到您設計的結構中。

Grove - NFC Tag

規格

  • 工作電壓:5V or 3V3
  • 工作電流<1mA
  • 識別距離< 2cm
  • 工作頻率: 13.56MHz
  • 符合ISO 15693 and ISO 18000-3 1標準
  • 64-bit 唯一識別碼(UID)
  • I2C 接口通信
  • Grove 接口

應用實例

手機讀寫模塊

  1. 下載安裝NfcV-reader for Androud and install it
  2. 啟動手機軟件,可以按照以下步驟讀寫標籤

NFC Tag 1.png NFC Tag 2.jpg NFC Tag 3.jpg NFC Tag 4.png

控制LED燈

  1. 硬件如下圖所示連接

Grove - NFC Tag Photo.jpg

  1. 下載NfcV-reader for Androud,安裝
  2. 下載NFC Tag Lib重命名為“NFC_Tag_M24LR6E”並且把次文件添加到Arduino’s庫裡面.
  3. 打開Arduino IDE. 如果Arduino IDE已經打開,重啟以下.
  4. 在Arduino IDE,點擊: File -> Example -> NFC_Tag_M24LR6E -> ledControl
  5. 下載完程序,現在可以通過手機去控制LED燈啦
 
#include "NfcTag.h" 
#include <Wire.h>
 
NfcTag nfcTag ; 
int led =  5 ; 
bool flag =  false ; 
bool preFlag =  false ; 
void  setup ( ) { 
  Serial . begin ( 9600 ) ; 
  pinMode ( led, OUTPUT ) ; 
  nfcTag. init ( ) ; 
}
 
void  loop ( ) { 
  flag = nfcTag. readByte ( EEPROM_I2C_LENGTH - 1 )  ==  0xff ? true : false ; 
  if ( flag ! = preFlag ) { 
    Serial . println ( "get remote NFC control signal!" ) ; 
    if ( flag ==  true ) { 
      Serial . println ( "led will light up!" ) ; 
      digitalWrite ( led, HIGH ) ; 
    } else { 
      Serial . println ( "led will turn dark!" ) ; 
      digitalWrite ( led, LOW ) ; 
    } 
    preFlag = flag ; 
  } 
  delay ( 5 * 1000 ) ; 
}


出貨清單

  • Grove – NFC Tag x1
  • Grove連接線 x1


Documents


=========================================================


Grove – NFC Tag

Grove – NFC Tag is a highly integrated Near Field Communication Tag module,this module is I2C interface,which base on M24LR64E-R,M24LR64E-R have a 64-bit unique identifier and 64 -Kbit EEPROM.Grove – NFC Tag attach an independent PCB antenna which can easily stretch out of any enclosure you use, leaving more room for you to design the exterior of your project.

Specifications

  • Working Voltage:5V or 3V3
  • Working Current<1mA
  • Effective range<2cm
  • Serve for contactless communication at 13.56MHz
  • ISO 15693 and ISO 18000-3 mode 1 compatible
  • 64-bit unique identifier (UID)
  • Read Block & Write (32-bit blocks)
  • Grove I2C Interface


Grove-NFC (PN532) 近場通訊模組 I2C/UART seeed

Grove – NFC (PN532) 近場通訊模組

Grove – NFC 近場通訊 是指短距離的無線通訊技術,應用的場合包括門禁管理系統和移動支付系統。近場通訊模塊集成了PN532收發芯片,在13.56MHz下無需接觸即可通訊,支持讀寫工作在13.56MHz的標籤,或者兩個近場通訊模塊可以完成點對點通信。近場通訊模塊配有的通訊接口包括I2C和UART,UART為默認的通訊方式。另外,模塊的天線引出的設計,無論你使用哪種盒子,都能方便地引出天線,給其他的設計騰出空間。

Grove - NFC

規格

  • 工作電壓3.3V
  • 工作電流:不工作時73mA,讀寫時83mA
  • 支持接口:I2C和UART(默認)
  • 支持ISO14443 A和B兩種協議
  • 最大通訊範圍了28mm
  • 支持點對點通訊
  • 尺寸:25.43mm*20.35mm
  • 配有通用的Grove接口


出貨清單

  • Grove – NFC x1,
  • NFC Antenna x1,
  • IPX connect wire – 120mm x1,
  • 24AWG Grove Cable  – 4P-4P-2.0-200mm x1

Grove - NFC 近場通訊模組

使用說明

下面介紹如何使用近場通訊模塊。

  1. 用Grove連接線把模塊連接到Grove基板I2C的Grove口上。
  2. 把Grove基板插到Arduino板上,Arduino板用USB連接線連到電腦上。
  3. 下載PN532庫文件,把下面4個文件夾(PN532、PN532_SPI、PN532_I2C 、PN532_HSU放到Arduino庫函數位置。
  4. 下載Don’s NDEF庫文件,同樣安裝到Arduino庫函數的位置。
  5. 重啟Arduino IDE。打開文件->示例->NDEF->ReadTag。
  6. 使用NDEF庫文件提供的I2C接口,需要焊掉背面P1和UART的連接,焊通P1和I2C。注意:Seeeduino Mega、Arduino Mega、Seeeduino lite、Arduino Leonardo也可以使用UART接口,需使用下面更改後的代碼。
Grove - NFC 近場通訊模組

當然你也可以使用UART接口而不需要額外的切割工作,這種情況下最好使用Seeeduino Mega(Arduino Mega) or Seeeduino lite(Arduino Leonardo)。下面是更新的程序:

#include "PN532_HSU.h" 
#include "PN532.h" 
#include "NfcAdapter.h"
 
PN532_HSU interface ( Serial1 ) ; 
NfcAdapter nfc = NfcAdapter ( interface ) ;
 
void  setup ( void )  { 
    Serial . begin ( 115200 ) ; 
    Serial . println ( "NDEF Reader" ) ; 
    nfc. begin ( ) ; 
}
 
void  loop ( void )  { 
    Serial . println ( " n Scan a NFC tag n " ) ; 
    if  ( nfc. tagPresent ( ) ) 
    { 
        NfcTag tag = nfc. read ( ) ; 
        tag. print ( ) ; 
    } 
    delay ( 5000 ) ; 
}

也可以使用Seeeduino或Arduino的UART接口和近場通訊模塊通訊,但無法使用串口監視器。


Documents

Grove – NFC wiki


=========================================================


Grove – NFC

Near Field Communication (NFC) is a set of short-range wireless technologies. It’s behind daily applications such as access control system and mobile payment system.

Grove NFC features a highly integrated transceiver module PN532 which handles contactless communication at 13.56MHz. You can read and write a 13.56MHz tag with this module or implement point to point data exchange with two NFCs. Grove NFC is designed to use I2C or UART communication protocols, and UART is the default mode. In addition, we assign an independent PCB antenna which can easily stretch out of any enclosure you use, leaving more room for you to design the exterior of your project.

Specification

  • Working Voltage: 3.3V
  • Working Current: Static Mode: 73mA, Write/Read Mode: 83mA
  • Support host interface: I2C, UART(default).
  • Serve for contactless communication at 13.56MHz.
  • Support ISO14443 Type A and Type B protocols.
  • Max operating distance for detecting NFC tags is 28mm depending on current antenna size.
  • Support P2P communication.
  • Dimensions: 25.43mm x 20.35mm

Part List

  • Grove – NFC x1
  • NFC Antenna x1
  • IPX connect wire – 120mm x1
  • 24AWG Grove Cable – 4P-4P-2.0-200mm x1


Grove - Ultrasonic Ranger 超音波測距模組

Grove – Ultrasonic Ranger 超音波測距模組 距離探測傳感器 seeed

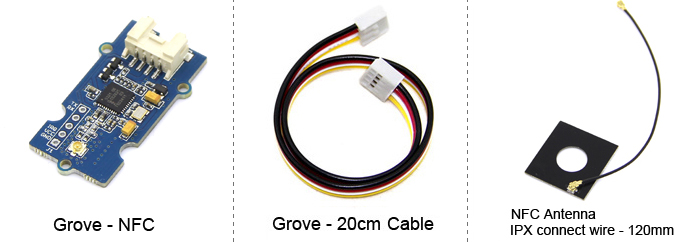
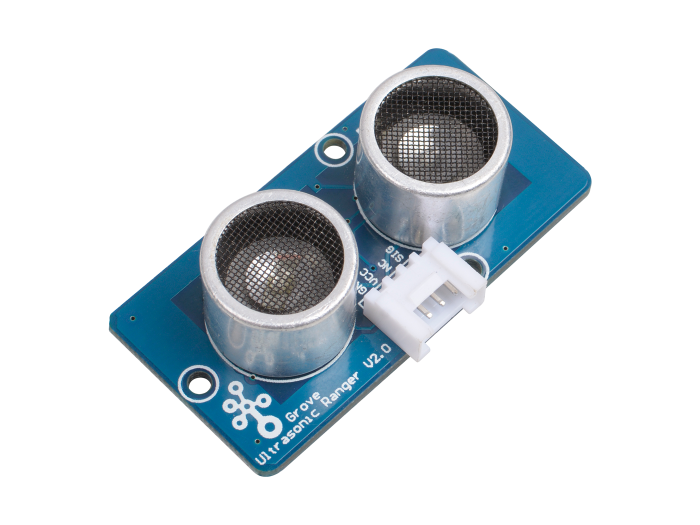
Grove – Ultrasonic Ranger 超音波測距模組 產品介紹

是一種利用超聲波測量距離的超聲波感測器。它的尺寸可以從3厘米到350厘米,精度可達2毫米。它 是一個完美的ü ltrasonic 用於距離測量,超聲波探測器。

該模組具有超聲波發射器和超聲波接收器,因此您可以將其視為超聲波收發器。熟悉聲納,當發射器產生的40KHz超聲波遇到物體時,聲波將被發射回去,接收器可以接收反射的超聲波。只需要計算從發射到接收的時間,然後乘以空中聲音的速度(340 m / s)來計算從傳感器到物體的距離。

Grove - Ultrasonic Distance Sensor
與傳統的超聲波模組HC-SR04相比,Grove – 超聲波距離感測器集成了單片機,發送信號和接收信號通過時分複用共用一個引腳,因此只佔用一個I / O引腳。另一個區別是HC-SR04僅支持5v電壓,而Grove – 超聲波距離傳感器支持5v和3.3v。我們知道,Raspberry pi I / O僅支持3.3v。因此,Grove – 超聲波距離傳感器可以直接連接到Raspberry Pi的I / O,但HC-SR04需要使用電壓轉換電路。
Grove - 超聲波距離傳感器引腳排列與HC-SR04

Grove – 超聲波距離感測器與HC-SR04

更重要的是,我們為Arduino,Python和Codecraft提供完整的文檔,以便您可以輕鬆地使用Grove – 超聲波距離感測器與Arduino和 Raspberry pi。寬電壓範圍,單I / O引腳,即插即用Grove連接器。

產品規格

  • 3.3v / 5v兼容,寬電壓等級:3.2v~5.2v
  • 工作電流:8毫安
  • 只需要3個引腳,節省了I / O資源
  • 測量範圍寬:3cm~350cm
  • 易於使用:Grove連接器,即插即用
  • 精度: 1厘米

硬件概述

Grove - 超聲波距離傳感器引腳

應用示例

這裡我們演示如何使用Grove – Ultrasonic Ranger來獲得距離信息,並打印到Grove – Serial LCD上。

UltrasonicRanger 距離探測傳感器

如上圖所示,將Serial LCD連接到D4/D5接口,Ultrasonic Ranger連接到D7口。然後你需要從github上下載我們提供的Ultrasonic Ranger庫文件和用到的1Serial LCD庫文件,對於非Arduino自帶的庫文件,你需要將下載的庫文件安裝到Arduino的Library中,具體安裝步驟請參考wiki首頁的”如何安裝庫文件”課題。安裝完成後,通過路徑:File->Examples->UltrasonicRanger->examples->UltraDisOnSeeedSerialLcd打開代碼並上傳。

/************************************************* **************************/        
// Function: Measure the distance to obstacles in front and display the
// result on seeedstudio serialLcd. Make sure you installed the
// serialLCD, SofewareSerial and Ultrasonic library.        
// Hardware: Grove - Ultrasonic Ranger, Grove - Serial LCD
// Arduino IDE: Arduino-1.0
// Author: LG                
// Date: Jan 17,2013
// Version: v1.0 modified by FrankieChu
// by www.seeedstudio.com

/************************************************* ****************************/


#include <SoftwareSerial.h>
#include <SerialLCD.h>
#include "Ultrasonic.h"

SerialLCD slcd(4,15);
Ultrasonic ultrasonic(7);
void setup()
{
   slcd.begin();
}
void loop()
{
        long RangeInCentimeters;
        RangeInCentimeters = ultrasonic.MeasureInCentimeters();
        delay(150);
        slcd.clear();
        slcd.setCursor(0,0);
        slcd.print("The distance:");
        slcd.setCursor(0,1) ;
        slcd.print(RangeInCentimeters,DEC);
        slcd.setCursor(5,1) ;
        slcd.print("cm");
}

在參考資料部分有這個demo的視頻教程,供你參考。

出貨清單

  • Grove – Ultrasonic Distance Sensor x1
  • Grove連接線 x1

Documents

Grove – Ultrasonic Distance Sensor

The Grove – Ultrasonic Distance Sensor is an ultrasonic transducer that utilizes ultrasonic waves to measures distance. It can measure from 3cm to 350cm with the accuracy up to 2mm.  It is a perfect ultrasonic module for distance measurement, proximity sensors, and ultrasonic detector.

This module has an ultrasonic transmitter and an ultrasonic receiver so you can consider it as an ultrasonic transceiver. Familiar with sonar, when the 40KHz ultrasonic wave generated by the transmitter encounters the object, the sound wave will be emitted back, and the receiver can receive the reflected ultrasonic wave. It is only necessary to calculate the time from the transmission to the reception, and then multiply the speed of the sound in the air(340 m/s) to calculate the distance from the sensor to the object.

Compared with traditional ultrasonic modules HC-SR04, the Grove – Ultrasonic Distance Sensor integrates a single-chip microcomputer, and the transmitting signal and the receiving signal share one pin by time division multiplexing, so only one I/O pin is occupied. Another difference is that HC-SR04 only supports 5v voltage, while Grove – Ultrasonic Distance Sensor supports 5v and 3.3v. As we know, the Raspberry pi I/O only supports 3.3v. Therefore, Grove – Ultrasonic Distance Sensor can be directly connected to the I/O of the Raspberry Pi, but HC-SR04 needs to use a voltage conversion circuit.

What’s more, we provide full documents and libraries for Arduino, Python, and Codecraft so that you can use the Grove – Ultrasonic Distance Sensor with Arduino and Raspberry pi easily. Wide voltage range, single I/O pin, plug and play Grove connector, we try our best to make this module easier to use and reduce your work. This is exactly the philosophy of Grove: simple is the best. We hope you like it.

Features

  • 3.3v / 5v compatible, wide voltage level: 3.2v~5.2v
  • Only 3 pins needed, save I/O resources
  • Wide measurement range: 3cm ~ 350cm
  • Easy to use: grove connector, plug and play

Applications

  • Distance measurement
  • Ultrasonic detector
  • Proximity alarm
  • Smart car

Seeed BLE Shield (HM11) 藍牙擴展板 相容 arduino seeeduino

Seeed BLE Shield (HM11) 藍牙擴展板 相容 arduino seeeduino

讓 Arduino 透過 UART 轉 BT 4.0 通訊

Seeed BLE Shield 是一款低功耗藍牙4.0傳輸模組。模塊採用的是TI CC2540 晶片,配置256Kb空間,支持AT指令。你可以將此模塊應用於遙控、遊戲手柄、數據無線採集、智慧家居等領域。同時作為Shield系列的一員,它能很方便的直插到開發板上使用。

本模組附技術文件與 Android 範例程式

參數一覽

  • 工作頻率: 2.4GHz ISM band
  • 調製方式: GFSK
  • 發射功率: -23dbm, -6dbm, 0dbm, 6dbm(可通過AT指令選擇)
  • 靈敏度 : ≤-84dBm at 0.1% BER
  • 傳輸速率: Asynchronous: 6K bytes , Synchronous: 6k Bytes
  • 支持服務: Central & Peripheral UUID FFE0,FFE1
  • 功耗: 工作電流小於15mA,搜索電流小於30mA,睡眠模式小於3mA
  • 供電電源: 5V DC
  • 工作溫度: –5 ~ +65 C
  • 通訊距離: 最大理論值為100m
  • 尺寸: 68mm x 43mm
  • HM-11:我們採用的藍牙低功耗模塊為HM-11模塊,詳情請點擊鏈接進入HM-11 wiki進行查閱。
  • Signal lamp: State為連接指示燈,當未連接時,指示燈大概以一秒每次的頻率閃爍;當已鏈接後,指示燈常亮。
  • Grove connectors: Seeed BLE Shield v1板上有兩個Grove接口,方便用戶直插Grove產品。
  • Hard or Softserial port:用戶可通過此跳帽選擇不同的數字口作為傳輸端口。此處絲印有兩處錯誤,查看PCB板絲印時請將”WIFI_TX”及”WIFI_RX”看成”BLE_TX”及“BLE_RX”
  • Reserved pinouts from HM-11: 這些引出口為HM-11模塊上的預留引腳,當用戶需要的時候,可以很迅速的焊接,以方便使用.
  • Reset button: 復位鍵,按下即可複位HM-11模塊。且,按下Seeed BLE Shield的複位鍵不會影響開發板的狀態。


硬件連接

BLE Shield 藍牙擴展板

直接將BLE Shield插入到Arduino/Seeeduino上. 請注意PCB板上跳帽的選擇.

軟串口通信

當你使用不同代碼的時候,Seeed BLE Shield可以作為主機或從機。當使用軟串口通信時,即使用軟件代碼對BLE模塊進行通信時,跳帽的選擇應為:BLE_TX–>D2,BLE_RX–>D3.
然後打開Arduino IDE v1.0.5,複製以下主機或從機的代碼,並下載到主板中。 從機代碼

#include <SoftwareSerial.h> //Software Serial Port
#define RxD 2
#define TxD 3
 
#define DEBUG_ENABLED 1
 
SoftwareSerial BLE(RxD,TxD);
 
void setup() 
{ 
  Serial.begin(9600);
  pinMode(RxD, INPUT);
  pinMode(TxD, OUTPUT);
  setupBleConnection();
 
} 
 
void loop() 
{ 
  char recvChar;
  while(1){
    if(BLE.available()){//check if there's any data sent from the remote BLE shield
      recvChar = BLE.read();
      Serial.print(recvChar);
    }
    if(Serial.available()){//check if there's any data sent from the local serial terminal, you can add the other applications here
      recvChar = Serial.read();
      BLE.print(recvChar);
    }
  }
} 
 
void setupBleConnection()
{
  BLE.begin(9600); //Set BLE BaudRate to default baud rate 9600
  BLE.print("AT+CLEAR"); //clear all previous setting
  BLE.print("AT+ROLE0"); //set the bluetooth name as a slaver
  BLE.print("AT+SAVE1"); //don't save the connect information
}

主機代碼

#include <SoftwareSerial.h> //Software Serial Port
#define RxD 2
#define TxD 3
 
#define DEBUG_ENABLED 1
 
SoftwareSerial BLE(RxD,TxD);
 
void setup() 
{ 
  Serial.begin(9600);
  pinMode(RxD, INPUT);
  pinMode(TxD, OUTPUT);
  setupBleConnection();
 
} 
 
void loop() 
{ 
  char recvChar;
  while(1){
    if(BLE.available()){//check if there's any data sent from the remote BLE shield
      recvChar = BLE.read();
      Serial.print(recvChar);
    }
    if(Serial.available()){//check if there's any data sent from the local serial terminal, you can add the other applications here
      recvChar = Serial.read();
      BLE.print(recvChar);
    }
  }
} 
 
void setupBleConnection()
{
  BLE.begin(9600); //Set BLE BaudRate to default baud rate 9600
  BLE.print("AT+CLEAR"); //clear all previous setting
  BLE.print("AT+ROLE1"); //set the bluetooth name as a master
  BLE.print("AT+SAVE1"); //don't save the connect information
}

硬串口通信

當然,你可以通過AT指令直接對BLE模塊進行操作,而不需要使用任何代碼。但需要注意跳帽的位置:BLE_TX–>D1,BLE_RX–>D2。
然後打開串口工具,比如MAC版用戶可以打開CoolTerm串口助手,PC版用戶可打開Sscom32串口工具。串口工具的設置如下:Baudrate: 9600(default) , Data Bits: 8, Parity: none, Stop Bits: 1

你可以發送指令”AT”進行測試,如果返回“OK”,即能夠通信。如果沒有返回任何值,用戶可以嘗試燒錄一個空程序到主板上,然後再發送指令“AT”進行測試。

void setup()
{                
}

void loop() 
{
}

確認可以通信之後,便可以發送AT指令給BLE模塊了。比如設置BLE模塊為從機,發送指令“AT+ROLE0”,如果返回“OK+Set:0”,即表示BLE模塊已設置成功。

Seeed BLE -3.png

AT指令

所有的AT指令都包含在以下的資源版塊的BLE模塊data sheet中,用戶請自行下載查閱。


Documents

台灣物聯科技 出貨最迅速